Sample: Blazor components
Overview
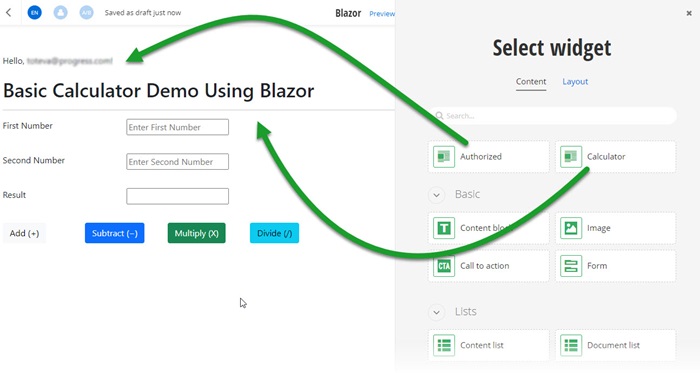
Use the Blazor sample to create two widgets that use Blazor components:
- Calculator widget – displays a calculator that can perform basic calculations.
- Authorized widget – displays the currently logged user
PREREQUISITES: Before you implement the sample, you must:
- Set up a Sitefinity renderer application and connect it to your Sitefinity CMS application.
For more information, see Install Sitefinity in ASP.NET Core mode.
- In your Renderer application, you must install the NuGet package
Microsoft.AspNetCore.Components.nupkg
NOTE: The instructions in this sample use Visual Studio 2022 and a Sitefinity renderer project named Renderer.
Blazor components
The sample works by wrapping the Blazor component (CalculatorComponent.razor) into a view component (CalculatorViewComponent.cs), which is displayed in the WYSIWYG editor as a widget. By using the out-of-the-box implementation for view components and their integration into the WYSIWYG editor, you can configure the Blazor components via the autogenerated designers.
You can then pass the configured values into the Blazor component as parameters through the view of the view component (Default.cshtml).
You achieve this by calling the RenderComponent method:
@(await Html.RenderComponentAsync<CalculatorComponent>

  (RenderMode.Server, new {Title = @Model.Title }))
NOTE: The Blazor widgets work with the rendering modes Server and ServerPrerendered.
Render content in edit or preview mode
There is the option to conditionally display content during the editing of the page. You can achieve this with the help of the NavigationManager class. The Calculator component (CalculatorComponent.razor) inherits from a base class called BlazorBase.cs that holds two methods IsEdit and IsPreview. They are used to determine the current state of the page - whether it is opened in edit or not.
Create the folder structure
Under your Renderer project, you must create the following folders:
ComponentsEntities/CalculatorViewComponentsViews/Shared/Components/AuthorizedViews/Shared/Components/Calculator
Create a custom layout file
You create a special layout file for pages that will hold the Blazor components. The key points is:
<script src="_framework/blazor.server.js"></script>
This includes the Blazor framework in the HTML. It is important to have it right before the closing <body> tag
Perform the following:
- In the context menu of folder
Views/Shared, click Add » Class…
- Select Code File.
- In Name, enter BlazorLayout.cshtml and click Add.
- In the file, paste the following code and save your changes:
Implement the authentication
To have the current user available in the Blazor components, you create a custom authentication provider class.
Perform the following:
- In the context menu of your
Renderer project, click Add » Class…
- In Name, enter CustomAuthenticationStateProvider.cs and click Add.
- In the class, paste the following code and save your changes:
Create the Blazor components
Perform the following
- In the context menu of folder
Components, click Add » Class…
- Select Code File.
- In Name, enter _Imports.razor and click Add.
- In the file, paste the following code and save your changes:
Perform the following:
- In the context menu of folder
Components, click Add » Class…
- In Name, enter BlazorBase.cs and click Add.
- In the class, paste the following code and save your changes:
Perform the following:
- In the context menu of folder
Components, click Add » Class…
- Select Code File.
- In Name, enter CalculatorComponent.razor and click Add.
- In the file, paste the following code and save your changes:
Perform the following:
- In the context menu of folder
Components, click Add » Class…
- Select Code File.
- In Name, enter AuthorizedComponent.razor and click Add.
- In the file, paste the following code and save your changes:
Create the widgets
Perform the following:
- In the context menu of folder
Entities/Calculator, click Add » Class…
- In Name, enter CalculatorEntity.cs and click Add.
- In the class, paste the following code and save your changes:
Perform the following:
- In the context menu of folder
ViewComponents, click Add » Class…
- In Name, enter CalculatorViewComponent.cs and click Add.
- In the class, paste the following code and save your changes:
Perform the following:
- In the context menu of folder
ViewComponents, click Add » Class…
- In Name, enter AuthorizedViewComponent.cs and click Add.
- In the class, paste the following code and save your changes:
Perform the following:
- In the context menu of folder
Views/Shared/Components/Calculator, click Add » Class…
- Select Code File.
- In Name, enter Default.cshtml and click Add.
- In the file, paste the following code and save your changes:
Perform the following:
- In the context menu of folder
Views/Shared/Components/Authorized, click Add » Class…
- Select Code File.
- In Name, enter Default.cshtml and click Add.
In the file, paste the following code and save your changes:
Integrate the Blazor framework and register the authentication provider
You integrate ASP.NET Core Blazor framework in your project by modifying the Program.cs file to include the necessary Blazor services and endpoints. You also need to register the authentication provider.
The Program.cs file should look in the following way:
Build your solution.
Result
When you open your Renderer application and open the New editor, you will see the Authorized and the Calculator widgets in the widget selector. When you add the widgets on your page, you can see the currently logged user and a calculator widget, where you can perform simple operations.
