Domain management
Overview
The Sitefinity Cloud Domain Management enables you to set up new domains to your Sitefinity Cloud environments and manage their certificates.
NOTE: The process steps described below - adding a domain in Sitefinity Cloud, domain ownership verification, assigning the domain to a Sitefinity site, and pointing the domain to an IP address, must be completed within 2 months time frame. If thе process is only partially completed within this period, the domain ownership verification state will change from Verified to Pending.
Domain quota
When you purchase a Sitefinity Cloud subscription, you also purchase a number of Production domains. If you try to add more Production domains than your quota allows, you will get a warning message that you have reached the quota limit for Production domains of your project.
If you want to increase the number of Production domains that you own, you have to purchase the Additional Domains add-on.
You have the option to add multiple subdomains under an additional Production domain with unlimited number of subdomains. This option is available after purchasing the Additional Domain with Unlimited Subdomains add-on. Note that adding unlimited number of subdomains will be applicable only to one of the Production domains that you own.
NOTE: During a Sitefinity Cloud infrastructure provisioning process, the Sitefinity Cloud engineering team assigns one service domain per environment, using a subdomain of the *.sitefinity.cloud DNS namespace with this naming pattern: [project_name]-[environment_name].sitefinity.cloud. This is a Progress-owned domain name and is only intended for infrastructure setup purposes. Subdomains of the *.sitefinity.cloud DNS namespace are NOT verified for additional non-Production or Production domains beyond the preconfigured ones. For this purpose, every Sitefinity Cloud customer must use their own domains and subdomains.
To check your current domains quota, click the View quota button available on the Domains page. The Domains quota dialog will display your current quota in the following format:
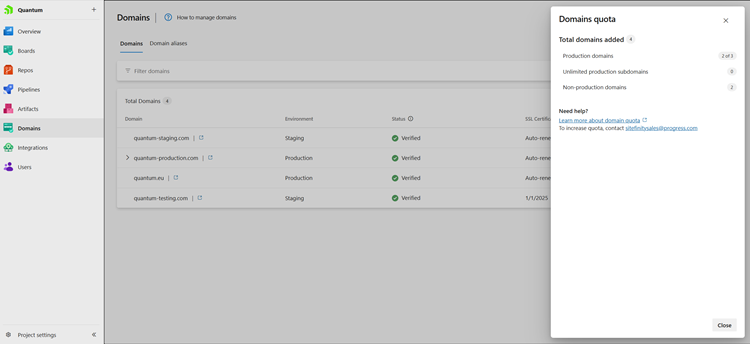
NOTE: To increase your domains quota, contact Sitefinity Sales.
Add a domain
To add a new domain to your license, perform the following:
- Login to Sitefinity Cloud Management Portal.
- In the left pane, click the Domains tab.
- Click Add a domain.
The Add a domain dialog opens.
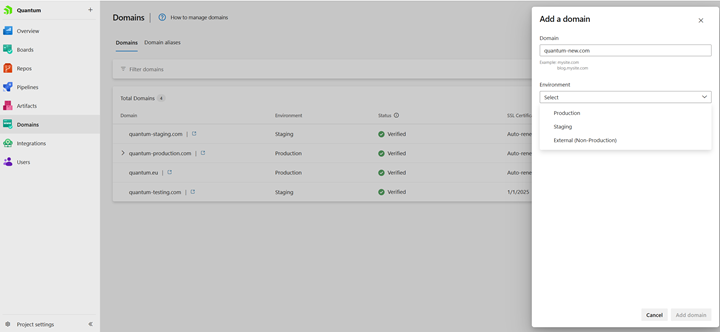
- Enter the domain name.
- Select the Sitefinity environment for which the domain will apply.
- To apply an SSL certificate for the new domain, select Request a new certificate and an SSL certificate will be automatically generated by Sitefinity Cloud.
Alternatively, you can upload an existing SSL certificate by performing the following:
- Select Use your own certificate.
This way, you can add a custom certificate in PEM format.
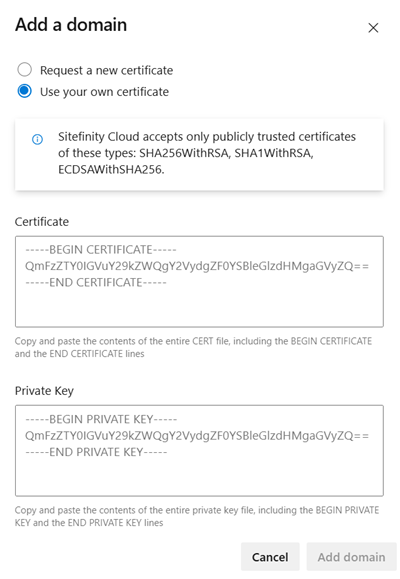
- In Certificate, copy and paste the contents of the entire
CERT file, including the BEGIN CERTIFICATE and the END CERTIFICATE lines.
- In Private Key, copy and paste the contents of the entire private key file, including the
BEGIN PRIVATE KEY and the END PRIVATE KEY lines.
- Click Add domain.
RESULT: After you have added a domain, it is pointed to the selected Sitefinity environment. The domain is automatically added to the Sitefinity license info. This way, there is no trial message when you start using it. It may take several minutes after adding the new domain, before the Sitefinity license info is updated. Next, you must manually verify the domain, assign it to a site, and point it to an IP address.
NOTE: If you have purchased the Additional Domain with Unlimited Subdomains add-on, you are enabled to add multiple subdomains under a dedicated Production domain with unlimited number of subdomains. You use the same procedure described in this section to add subdomains under an already created and verified Production domain with unlimited subdomains.
Verify the domain
After you have added a domain in Sitefinity Cloud Management Portal, you must verify it through your domain registrar system.
To do this, perform the following:
- In Sitefinity Cloud Management Portal, navigate to Domains.
- Expand the More actions menu of the domain that you want to verify.
- Click View domain details.
The Domain details dialog opens.
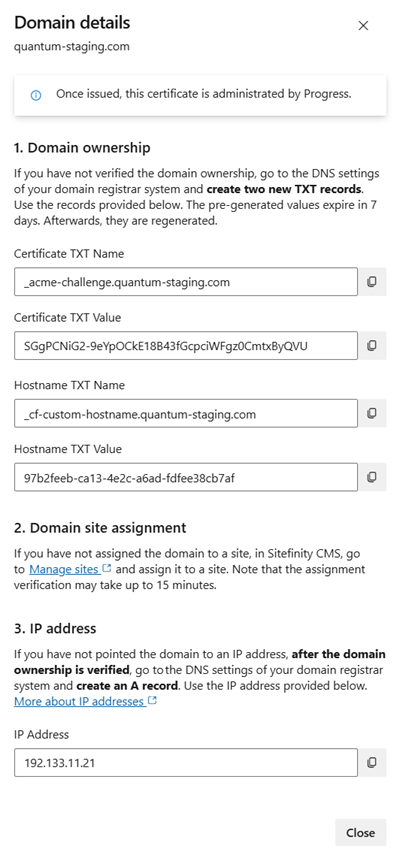
- Under Domain ownership, copy the values of the following fields:
- Certificate TXT Name
- Certificate TXT Value
- Hostname TXT Name
- Hostname TXT Value
- Navigate to the DNS settings of your domain registrar system.
- Create two new
TXT records with the names and values copied in Step 4.
NOTE: The pre-generated values of the verification records in Sitefinity Cloud Management Portal will expire in seven days. Afterwards, they are re-generated and you have to use the newly generated values. If you do not create the verification records directly after creating the domain, make sure you copy the latest values.
RESULT: Your domain is in the process of verification. This is indicated by displaying Pending in the Status column of the domain. After the domain is verified, Domain ownership details will disappear from the domain details and the status will change to Verified.
Assign the domain to a Sitefinity site
After you have added and verified a domain, you must assign it to a site from your Sitefinity CMS multisite instance.
To do this, perform the following:
- Login to your Sitefinity CMS instance.
- Click the site selector in the upper-left corner of the page.
- Click the Manage sites link.

- Click the site that you want to assign to the domain.
- Enter the new domain.
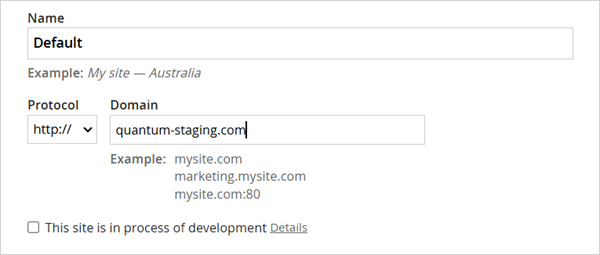
- Save your changes.
Point the domain to an IP address
After you add a new domain, verify it, and assign it to a site, in order for the domain to resolve to your Sitefinity site, you must point the domain in your domain registrar system to a specific IP.
Perform the following:
- In your Sitefinity Cloud Management Portal, navigate to Domains.
- Expand More actions menu of the domain that you want to verify.
- Click View domain details.
- Under IP address, copy the values of the IP address field.
- Go to the DNS settings of your domain registrar system.
- Create an
A record using the value of the IP that you copied.
NOTE: The IP may change after a period of time. We recommend that you use the latest value of the IP from the domain details screen, before you point your domain to it. However, domains that have been pointed to an IP will continue working, regardless of whether the IP has changed.
Add a domain alias
Domain aliases are alternative domains for your website. They redirect tо the main Production domain.
Every Production domain comes with 3 domain aliases. If you have multiple Production domains, you can distribute all the aliases between them, as required. Additionally, each Production domain can have only one www subdomain added as an alias.
Technically, a domain alias is a second domain linked to an existing site and having the same representation. As long as the alias is used for the same site in Sitefinity Cloud, it a valid domain alias.
The following example demonstrates correct usage of domain aliases in a multisite setup:
- Site 1
- how2authenticate.com (main Production domain)
- www.how2authenticate.com (subdomain added as an alias)
- how2auth.com (alias)
- www.how2auth.com (alias)
- Site 2
- bigtechnologies.com (main Production domain)
- www.bigtechnologies.com (subdomain added as an alias)
- bigtech.com (alias)
- www.bigtech.com (alias)
Procedure
To add a domain alias to your Production domain, perform the following:
- Login to Sitefinity Cloud Management Portal.
- In the left pane, click the Domain aliases tab.
- Click Add a domain alias.
NOTE: If you try to add more aliases than your quota allows, you will get a warning message that you have reached the quota limit for domain aliases of your project. To increase your quota, contact Sitefinity Sales.
- In the Add a domain alias dialog that opens, enter the domain alias name.
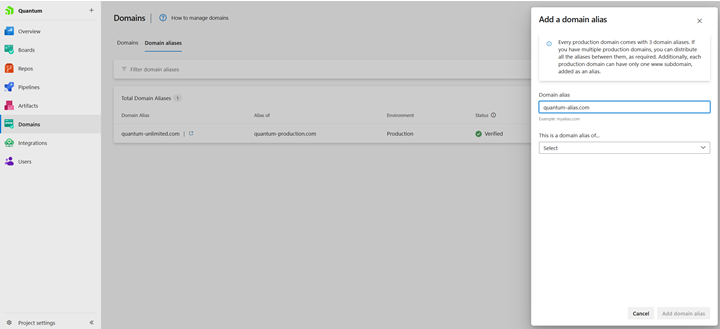
- Under This is a domain alias of..., select the Production domain for which the domain alias will apply.
- To apply an SSL certificate for the new domain alias, select Request a new certificate and an SSL certificate will be automatically generated by Sitefinity Cloud.
Alternatively, you can upload an existing SSL certificate by performing the following:
- Select Use your own certificate.
This way, you can add a custom certificate in PEM format.
- In Certificate, copy and paste the contents of the entire
CERT file, including the BEGIN CERTIFICATE and the END CERTIFICATE lines.
- In Private Key, copy and paste the contents of the entire private key file, including the
BEGIN PRIVATE KEY and the END PRIVATE KEY lines.
- Click Add domain alias.
Renew the SSL certificate
If you are using a custom certificate for your domain, you must upload a new one before the current one reaches its expiration. You will receive an email before the certificate expires, reminding you that you must renew it.
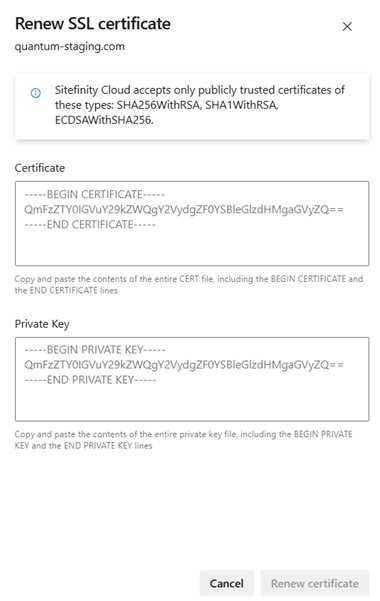
To upload a new custom certificate, expand the More actions menu of the domain and click Renew certificate. This will open the Renew SSL certificate dialog where you can upload the new certificate in PEM format.
Delete a domain
To delete a domain, expand the More actions menu of the domain and select Remove domain.
If a domain is the only verified domain for a particular environment, you cannot delete it. To delete it, you must add and verify a new one first.
If a Production domain has existing aliases, you must first delete all the aliases before deleting the domain itself.
Use a domain for local or external development
If you want to set up your site locally with a domain different than localhost - for example, local.example.com, and you want to have that domain in the license info, you must add it through the Domain Management.
When adding a domain for local development, select the External (Non-Production) environment (see the Add a domain section above). This way, the domain will not count towards your Production domains quota. If you have set up Sitefinity CMS in an environment outside of Sitefinity Cloud, you can perform the same steps to add a domain for that environment.
After you have added the domain, you do not need to verify it. For the Sitefinity instance to update its license info, you must restart it.