Sample: Mega menu
Overview
This sample demonstrates how to build a custom navigation menu with nested child widgets. It is useful for large sites where the sitemap does not fit into one or two levels. Additionally, you can use the sample to insert custom widgets inside the menu and display them when hovering over a specific page.
You can choose from the following options:
PREREQUISITES: You must set up a Sitefinity renderer application and connect it to your Sitefinity CMS application. For more information, see Install Sitefinity in ASP.NET Core mode.
NOTE: The instructions in this sample use Visual Studio 2022 and a Sitefinity renderer project named Renderer.
Folder structure
Under your Renderer project, you must create the following folders:
Entities/MegaMenuModels/MegaMenuViewModels/MegaMenuViewComponents
Views/Shared/Components/MegaMenuwwwroot/styles
Create a custom layout file
You must register the scripts in the _Layout.cshtml file. You must then use this custom base layout for every page where the MegaMenu is placed
Perform the following:
- In the context menu of folder
Views/Shared, click Add » Class…
- Select Code File.
- In Name, enter _Layout.cshtml and click Add.
- In the file, paste the following code and save your changes:
Create the widget
- In the context menu of folder
Entities/MegaMenu, click Add » Class…
- In Name, enter MegaMenuEntity.cs and click Add.
- In the class, paste the following code and save your changes:
- In the context menu of folder
Models/MegaMenu, click Add » Class…
- In Name, enter MegaMenuModel.cs and click Add.
- In the class, paste the following code and save your changes:
- In the context menu of folder
Models/MegaMenu, click Add » Class…
- In Name, enter IMegaMenuModel.cs and click Add.
- In the class, paste the following code and save your changes:
- In the context menu of folder
ViewModels/MegaMenu, click Add » Class…
- In Name, enter MegaMenuViewModel.cs and click Add.
- In the class, paste the following code and save your changes:
- In the context menu of folder
ViewComponents, click Add » Class…
- In Name, enter MegaMenuViewComponent.cs and click Add.
- In the class, paste the following code and save your changes:
- In the context menu of folder
Views/Shared/Components/MegaMenu, click Add » Class…
- Select Code File.
- In Name, enter Default.cshtml and click Add.
- In the class, paste the following code and save your changes:
Import the common directives
The Program.cs file should look in the following way:
- In the context menu of folder
Views, click Add » Class…
- Select Code File.
- In Name, enter _LayoutImports.cshtml and click Add.
- In the class, paste the following code and save your changes:
- In the context menu of folder
Views/Shared/Components, click Add » Class…
- Select Code File.
- In Name, enter _LayoutImports.cshtml and click Add.
- In the class, paste the following code and save your changes:
Create the syles
- In the context menu of folder
wwwroot/styles, click Add » New Item…
- In Name, enter styles.css and click Add.
- In the file, paste the following code and save your changes:
- In the context menu of folder
wwwroot/styles, click Add » New Item…
- In Name, enter edit.css and click Add.
- In the file, paste the following code and save your changes:
Build your solution.
Result
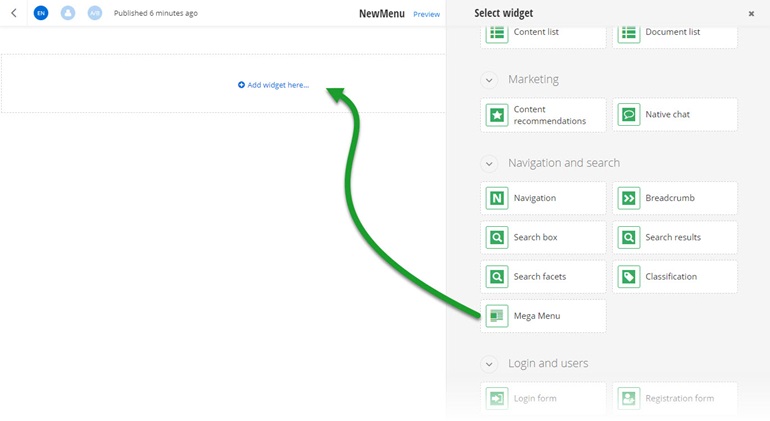
When you open your Renderer application and open the New editor, you will see the MegaMenu widget in the widget selector. When you add the widget on your page and edit it, you can choose which pages to be part of the menu and how to display them.

Run the sample
This sample is available in Sitefinity’s GitHub repository. You can run and play with it.
To do this, perform the following:
- Go to Sitefinity’s GitHub repository Sitefinity ASP.NET Core samples.
- Expand Code and click Download ZIP.
- Extract the files on your computer.
- In the extracted folder, navigate to
sitefinity-aspnetcore-mvc-samples-master/src/mega-menu folder.
- Open the
mega-menu.sln in Visual Studio.
- Open the
appsettings.json file.
- In section
“Sitefinity”, change the “Url” property to the URL of your Sitefinity CMS site.
If you have deployed Sitefinity CMS on the IIS, point to “https://localhost:<https_port>".
- In Visual Studio, in the context menu of
mega-menu project, click View in Browser.
- Log in to your Sitefinity CMS instance and place the widget on a page.